
Vanilla planifolia Care Sheet

Everyone these days is familiar with the popular Vanilla flavoring used in everything from ice cream and soda to candles and bath lotion. What most people don’t know is that Vanilla comes from a rare and hard to propagate orchid. This vine-like family is classified as epiphytes, just like Cattleyas and Phalaenopsis. Several species fall into this genus, including the popular Vanilla planifolia, which is the one most used for flavoring. Growths climb up high onto trees and attach to the bark with roots growing from the leaf joints. Caring for these plants is relatively simple, although providing adequate space can be challenging. It is recommended to grow these in large greenhouses, lath houses, or sunrooms and provide a sturdy structure after the plant has reached at least four or more feet in length. As they grow, the roots that are produced from along the stem will grow downward until they touch a suitable surface to attach to, such as soil, mulch, tree branches or even your living room carpet if available. Plants will require bright filtered light and warm temperatures, usually in the 60’s or above. Also, high humidity is appreciated, since they are essentially mounted with only the bottom most roots growing in medium.
We have had success with two growing mixes. The first is a terrestrial medium, consisting of half seedling grade fir bark or cypress and half peat based potting soil. Plants can grow in this medium for 3 plus years. The other is sphagnum moss. The sphagnum will need to be replaced after about 6-8 months if you choose this method. A young plant with active roots can be replanted easily as it grows, simply bare root and repot like other orchids, avoiding breaking roots or stems. A word of caution, the sap that occurs from broken roots or stems can be irritating to the skin. If you have a reaction, wash your skin thoroughly with soap and cold water. Another option is to root your own cuttings, usually divisions are 2-3 feet long. (We recommend only taking these from plants at least 20 feet or more length.) Allow the cut to dry completely before planting and if needed treat with a fungicide since newly cut divisions are prone to ‘damping off’, a type of brown rot. After the cuttings have healed over, usually 2-3 days minimum you can move them onto damp media to encourage root growth. We recommend use a shallow but fluffy layer of damp sphagnum moss and lay the bottommost aerial roots across the media. Do not bury the cut end completely. Layer more moss over the roots in the container.
Later, as the plant matures air roots will appear above the soil line. These can be guided down to the pot, allowed to grow into the ground of your greenhouse or trained onto a wooden structure. Keep soil or moss on the dry side for the first month or so and then water only enough to keep soil damp to the touch.
Vanilla blooms are small and appear in clusters only once a year. Mature plants are usually thirty feet or longer before they will reach flowering size. Blooms are a creamy green color and have a pungent scent. In order to achieve the prized ‘Vanilla Bean’ you must hand pollinate the bloom early on the morning the bloom opens since the flower lasts less than one day. After pollinating, pods will appear within the first two months, but then must be left on the vine for a total of at least nine months to ripen. At that time, they can be harvested and proper curing methods should be taken before they are edible.
**********************************************************************************

* Gloves to protect your hands.
* A shallow but very wide container, A plastic pot or tray with drain holes is best.
* Fresh, damp New Zealand Sphagnum Moss
* 12-14 gauge floral wire
* Metal Hanger suitable for your chosen container


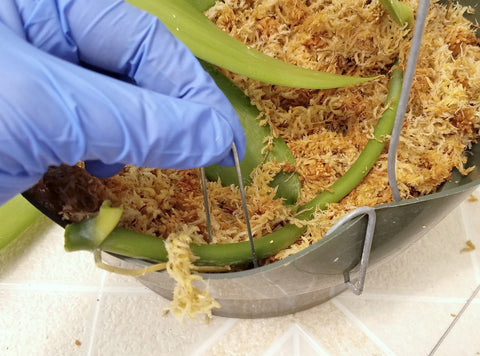

After securing the cutting in the media, add a wire hanger that attaches to the sides of your pot. Wind the cutting up and the around the hanger, using twist-tie to affix in place. This helps to prevent the plant from pulling up or falling out of the moss while the roots are becoming established. Over time the plant will eventually need a larger structure to climb onto.